
Commercial Sealant & Caulk Selection Guide
Complete guide to selecting, specifying, and installing sealants and caulks for construction applications
Last updated: June 11, 2026
Silicone sealants that meet ASTM C920
ASTM C920 is the workhorse movement-joint spec. These pro-grade silicones are stocked in cases. Full chemistry breakdown below: polyurethane, acrylic, MS-polymer, foam, and specialty.


Sealing a moving expansion joint or specifying ASTM C920? Use the Joint Sealant Selection Guide to translate the joint into a Type/Grade/Class/Use spec. For bridge deck expansion joints (strip seal, modular, finger plate, asphaltic plug, compression seal), see the Bridge Expansion Joint Guide. This page covers building-envelope caulking and siding gaps.
Already specifying a brand? Find an in-stock equivalent.
Search by part number or product name from Boss, DAP, Hilti, OSI, Sika, 3M, and more.
Quick Sealant Finder
What are you sealing? Pick an application and we'll recommend the right product type.
Introduction
Sealants and caulks seal gaps, joints, and transitions in buildings. They prevent water infiltration, air leakage, and allow for thermal expansion and structural movement. Choosing the wrong sealant leads to premature failure, water damage, and costly repairs.
Sealant vs Caulk: Is There a Difference?
There is no functional difference between the two words and the industry uses both these terms interchangeably! Which can lead to some confusion (it did for us when we first started). "Caulk" or "caulking" traditionally refers to painter's grade acrylic latex used for trim and molding. "Sealant" implies higher-performance elastomeric products for expansion joints and building envelope applications. Both serve the same purpose: sealing gaps to prevent water, air, pest, heat, sound transfer or other things from passing through. The material and type of sealant/caulk is what matters most depending on the application.
Movement: The Critical Factor
Joint movement determines which sealant you need. Temperature changes cause materials to expand and contract. A 100-foot concrete slab can move 3/4 inch between summer and winter. Your sealant must stretch and compress without failing.
- Low movement (±7-12%): Interior trim, drywall, painter's caulk applications
- Moderate movement (±25%): Window perimeters, some concrete joints
- High movement (±50%): Building expansion joints, curtain wall, glazing systems
Common Failure Modes
- Adhesion failure: Sealant pulls away from substrate (poor surface prep, wrong primer)
- Cohesive failure: Sealant tears in middle (exceeded movement capability)
- Three-sided adhesion: Stuck to bottom of joint, fails prematurely (missing backer rod)
- Hardening/brittleness: Lost elasticity (UV degradation, aged material)
- Staining: Plasticizer bleed (wrong product on porous stone)
Match sealant type to joint movement, substrate compatibility, and environmental exposure. No single product works for everything. Surface preparation determines 80% of sealant success or failure.
Silicone Sealants
Silicone sealants offer the highest movement capability (±50%), widest temperature range (-60°F to 400°F+), and best UV resistance. They never truly harden - maintain elasticity for 20-50+ years. Cannot be painted.
Key Characteristics
Movement: ±50% (Class 50)
Temperature: -60°F to 400°F+
UV Resistance: Excellent
Paintable: No
Standards: ASTM C920 Class 50
Best Applications
- Glazing systems (windows, curtain walls)
- Metal panel joints
- High-temperature areas
- Wet areas (neutral cure)
- Roof penetrations and flashings
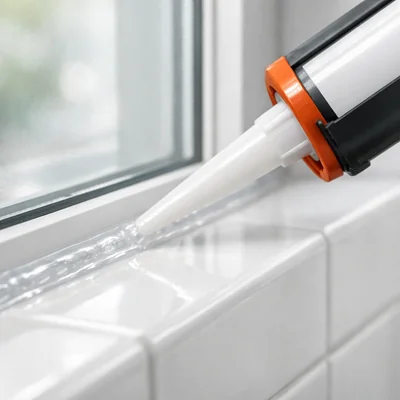
Acetoxy vs Neutral Cure
Acetoxy cure: Releases acetic acid during cure (vinegar smell). Cures faster, costs less. Use for most applications - glass, aluminum, most metals, exterior applications.
Neutral cure: Releases alcohols (mild smell). Cures slower, more expensive. Use for metals that acetoxy corrodes (copper, brass, zinc), mirrors (acetoxy etches backing), kitchens/baths (acetoxy smell unpleasant), natural stone (prevents staining).
Limitations
- Cannot paint over (paint won't stick)
- Some formulations bleed oils on porous surfaces
- Incompatible with some plastics (polycarbonate, acrylic)
- Most expensive sealant type
- Acetoxy cure corrodes certain metals
💡 Pro-Tip:
Acetoxy 100% silicone (TruSil 100, TruSil HTS) is the standard chemistry — it bonds well to glass, ceramic, painted/coated metal, galvanized steel, stainless, aluminum, and most building substrates. The brief acetic acid release during cure dissipates within 24-48 hours. For long-life joints against bare copper, brass, zinc, lead, weathering steel, polished marble, or mirror backings, specify a neutral-cure (oxime or alkoxy) silicone instead — we don't currently carry one in catalog. Match chemistry to substrate before ordering, not after.
Shop Specialty SealantsFor detailed guidance on high-temperature applications (furnace flues, HVAC, industrial equipment), see the High-Temperature Sealants section below.
Silicone Sealant Products
Polyurethane Sealants

Polyurethane sealants offer excellent adhesion to nearly all substrates, good movement capability (±25% to ±50%), and can be painted after cure. They provide the best balance of performance, versatility, and cost for most construction applications.
Key Characteristics
Movement: ±25% to ±50%
Temperature: -40°F to 180°F
UV Resistance: Good (yellows over time)
Paintable: Yes (after cure)
Standards: ASTM C920 Class 25 or 50
Best Applications
- Expansion joints (concrete, masonry)
- Curtain wall perimeter joints
- Precast panel joints
- Parking deck joints (traffic-rated)
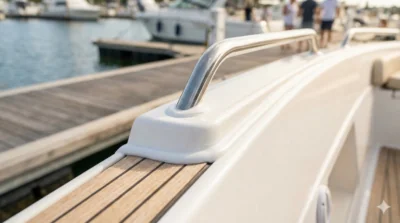
- Marine applications
- Window/door perimeters (painted trim)
Advantages Over Other Sealants
- Bonds to almost anything without primer: concrete, wood, metal, glass, masonry
- Can be painted to match adjacent surfaces
- Excellent abrasion and tear resistance (traffic-rated versions)
- Superior adhesion in wet or damp conditions
- Good chemical resistance
- Lower cost than silicone for similar performance
Limitations
- UV exposure causes yellowing (functional but cosmetic issue)
- Skin-over time 5-30 minutes (must tool quickly)
- Moisture-sensitive before cure (avoid rain, high humidity)
- Primer required on some porous substrates
- Isocyanate chemistry (safety precautions during application)
Sikaflex-1a and similar one-component polyurethanes are the workhorse sealants for construction. They handle most expansion joint applications, bond to everything, and can be painted. When in doubt between silicone and polyurethane, choose polyurethane unless you need Class 50 movement or high-temperature resistance.
Polyurethane Sealant Products


Acrylic & Latex Caulks
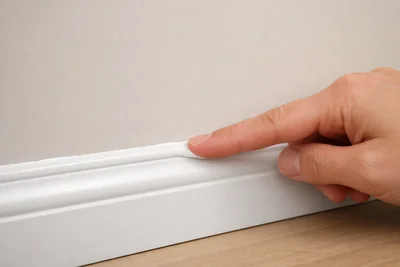
Acrylic and latex caulks are water-based, paintable products for low-movement applications like trim, molding, and drywall gaps. They're the most economical option for interior work and painter's applications.
Key Characteristics
Movement: ±7.5% to ±12.5%
Temperature: 0°F to 180°F
UV Resistance: Good
Paintable: Yes (immediately or after skin)
Water cleanup: Soap and water
Best Applications
- Trim and molding gaps
- Window/door casing perimeters
- Drywall corner beads
- Baseboards and crown molding
- Interior cracks and gaps
- Painter's caulk applications
Three Types of Acrylic Caulk
100% Acrylic: Best performance, exterior-grade. Flexible, durable, minimal shrinkage. Use for exterior trim, painted wood, fiber cement siding. Most expensive acrylic option.
Acrylic Latex: Economy grade, primarily interior. More shrinkage, less flexibility. Use for interior trim, baseboards, non-critical gaps. Lowest cost.
Siliconized Acrylic: Acrylic with added silicone for better water resistance and adhesion. Use for kitchens, baths (non-shower areas), painted exterior trim. Mid-range price. Still paintable unlike pure silicone.
Limitations
- Low movement capability (not for expansion joints)
- Significant shrinkage (especially lower-grade products)
- Not for constantly wet areas (silicone or polyurethane better)
- Freezes before application (store above 40°F)
- Some formulations crack in cold climates
- Less durable than elastomeric sealants
When to use acrylic vs elastomeric: Use acrylic caulks for gaps that don't move: trim work, nail holes, cosmetic sealing. Use elastomeric sealants (silicone, polyurethane) for joints with movement: expansion joints, building envelope, structural applications. Right product for right application prevents premature failure.
Acrylic & Latex Caulk Products
View all 9

Everkem EcoTex 25 Acrylic Latex Caulk
$46.00


Everkem SilTex 40 Siliconized Acrylic Latex Caulk
$69.00


Red Devil Kitchen & Bath Siliconized Acrylic Caulk – 10.1 oz.
$40.00


Red Devil Lifetime Ultra 230 Premium Elastomeric Acrylic Latex Sealant 10.1 FL OZ Cartridge
$35.00


Red Devil Masonry & Concrete Acrylic Sealant – 10.1 oz. Gray
$4.50


Red Devil Speed Demon Acrylic Caulk – 10.1 oz. White
$24.00
Polyurethane Foam Sealants
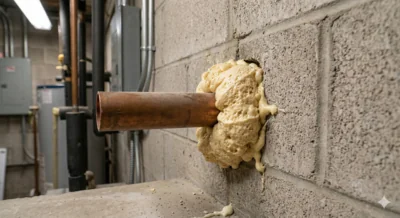
Expanding polyurethane foam fills large gaps and cavities that traditional sealants cannot. Foam expands 2-6 times its applied volume, providing both air sealing and thermal insulation.
Low-Expansion Foam
Expansion: 2-3× applied volume
Use: Windows, doors, controlled fill
Advantage: Won't bow frames
R-value: ~R-5 per inch
Fireblock Foam
Color: Orange/red (identifies fireblock)
Use: Penetrations in fire-rated assemblies
Required: Building code air sealing
Meets: IRC and IBC fireblock requirements
High-Expansion Foam
Expansion: 4-6× applied volume
Use: Large gaps, utility penetrations
Warning: Can bow frames if over-applied
Best: Cavities, pest barriers, rim joists
Applications
- Window and door frame gaps (use low-expansion)
- Utility penetrations (electrical, plumbing, HVAC)
- Rim joist air sealing
- HVAC chase sealing
- Pest barriers (mice, insects cannot chew through cured foam)
- Insulating irregular cavities
- Stabilizing loose materials
Critical Installation Notes
- Apply in thin layers - foam expands significantly
- Fill gap only 50% full, let expand to fill completely
- Over-expansion can bow door/window frames (use low-expansion)
- Trim excess after full cure (24 hours)
- Must be covered - UV degrades exposed foam
- Paint or cover with trim, siding, drywall
- Wear gloves - uncured foam extremely sticky, difficult to remove
- Clean nozzle immediately after use
Warning: Foam gun-grade products require dedicated foam gun applicator. Straw-style cans for small gaps only. Never over-apply - foam continues expanding for several hours. Start with less than you think you need. Can always add more; cannot easily remove excess from confined spaces.
Polyurethane Foam Sealant Products


MS Polymer / Hybrid Sealants
MS (Modified Silane) Polymer sealants combine the best properties of silicone and polyurethane: paintable, high movement capability, excellent weather resistance, and no isocyanates. Newer technology with premium performance.
- Movement: ±25%
- Temperature: -40�°F to 200°F
- Paintable: Yes
- UV resistance: Excellent
- No isocyanates, low odor
- Bonds without primer on most substrates
- Can apply in wet conditions
Use for marine applications, RV/manufactured housing, automotive, or anywhere requiring both movement capability and paintability. More expensive than traditional sealants but superior performance justifies cost for critical applications.
High-Temperature Sealants
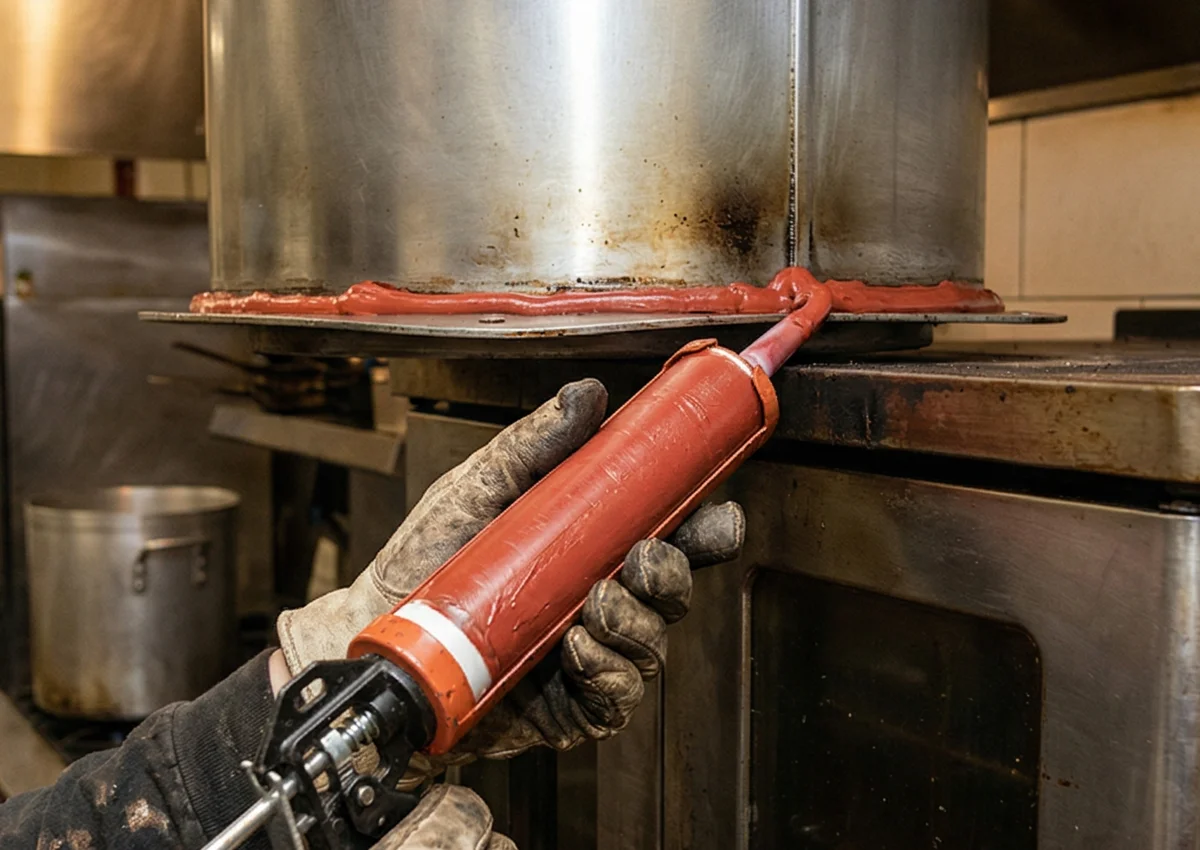
High-temperature applications require sealants specifically rated for continuous or intermittent heat exposure. Standard sealants fail when exposed to temperatures beyond their rating — they harden, crack, or lose adhesion. Common applications include furnace flues, HVAC equipment, industrial ovens, exhaust systems, and roof penetrations near heat sources. For product-by-product selection (TruSil 100 at 400°F continuous and Hi-Temp / TruSil HTS at 500°F continuous, both NSF-51), see the dedicated High-Temperature Silicone Sealant Selection Guide.
Critical distinction: Continuous temperature rating (what the surface stays at) vs. intermittent rating (brief spikes). A furnace flue might hit 600°F intermittently but run at 300°F continuously. Use the continuous rating for product selection.
Temperature Range Guide
| Temp Range | Product Type | Common Applications |
|---|---|---|
| 200-400°F | Standard silicone (red RTV, acetoxy or neutral cure) | Water heater flues, HVAC ductwork, roof vents, light industrial |
| 400-600°F | High-temp RTV silicone (black or red, labeled "high-temp") | Furnace flues, boiler piping, industrial ovens, automotive exhaust |
| 600°F+ | Furnace cement, refractory mortar (ceramic-based, non-elastomeric) | Wood stove pipes, chimneys, kilns, foundry equipment |
Installation Requirements for Hot Surfaces
Surface preparation:
- Surface must be cool to touch before application (below 100°F)
- Remove all rust, scale, old sealant with wire brush
- Clean with solvent - oil residue prevents adhesion at temperature
- Some products require primer on bare metal - check datasheet
- Allow primer to dry completely before sealant application
Application technique:
- Apply in continuous bead without gaps or voids
- Tool smooth while still wet - cannot rework after skinning
- For joints, use backer rod to control depth (typical 1:2 depth to width)
- Allow full cure before heat exposure (typically 24 hours minimum)
- First heat cycle: bring to temperature gradually if possible
Substrate compatibility at temperature:
- Steel, stainless, cast iron: Excellent to any temp within sealant rating
- Aluminum: Good, but high thermal expansion - size joint for movement
- Copper, brass: Use neutral cure only - acetoxy corrodes at any temperature
- Galvanized: High-temp causes zinc to oxidize - use primer
- Painted surfaces: Paint typically fails before sealant - seal bare metal
Common Mistakes to Avoid
- Using standard silicone rated for 400°F continuous on a surface that reaches 300°F (assumes "it's under the rating"). Continuous exposure near the upper limit causes accelerated degradation. Use product rated at least 100°F above your actual temperature.
- Applying sealant while equipment is still warm (120°F surface temp). Sealant starts curing before proper adhesion develops. Results in poor bond that fails when brought to full temperature.
- Using acetoxy cure silicone on copper furnace piping. Acetoxy releases acetic acid during cure that corrodes copper - worse at elevated temperature. Always use neutral cure on copper, brass, zinc-coated metals.
- Not accounting for thermal expansion when sizing joint width. Metal expands significantly when heated - 10-foot steel pipe can expand 3/4 inch from room temp to 600°F. Joint must accommodate this movement or sealant tears.
- Confusing intermittent and continuous ratings. Product rated "intermittent 600°F" might only handle 400°F continuous. If your surface stays hot, use continuous rating. Intermittent means brief exposure (under 1 hour), not daily cycling.
Safety Warning
Working around hot equipment requires proper PPE including heat-resistant gloves and eye protection. Allow equipment to cool completely before application. Sealant fumes at temperature can be hazardous - ensure adequate ventilation. Never work on live furnaces or boilers - shut down, lockout, and allow cooldown period per manufacturer requirements.
When NOT to Use Sealant
Some high-temp applications require gaskets, not sealants:
- Furnace burner assemblies: Use gaskets specified by manufacturer
- Flanged connections with bolts: Gasket material, not sealant
- Heat exchanger assemblies: Manufacturer-specified gaskets only
- Pressure vessels: Code-required gasket systems
- Any application where disassembly is required: Sealant makes removal difficult
Specialty Sealants
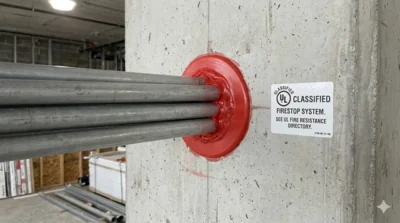
Firestop Sealants
UL-listed systems for through-penetrations in fire-rated walls and floors. Must follow tested assembly exactly - substitutions void listing.
- Intumescent: Expands with heat to maintain seal
- Endothermic: Releases water vapor to cool surrounding area
- Hourly ratings: 1-hr, 2-hr, 3-hr, 4-hr
- F-rating: Flame through resistance
- T-rating: Temperature rise on unexposed side
- Standards: UL 1479, ASTM E814, UL 2079
Related: Firestop Sealant Requirements for Commercial Buildings
For IBC 2021 special inspection requirements, common violations, and how to read UL system listings, see our Firestop Inspection Requirements Guide.


Acoustical Sealants
Non-hardening sealants that remain permanently flexible. Seal sound paths at drywall perimeters, electrical boxes, and penetrations in sound-rated walls.
- Never fully cure - stay tacky
- STC ratings (Sound Transmission Class)
- Apply at all wall/floor/ceiling perimeters
- Behind electrical boxes in sound walls
- Standards: ASTM E90, E413 (STC testing)
For STC ranges by wall assembly, IBC Section 1206 requirements, application bead sizes, and product picks, see our Acoustic Sealant for Soundproofing Guide. Building walls between dwelling units that have to pass a field sound test? The STC 50 Wall Assemblies Guide covers the code requirement, the test, and the sealing details that decide it.
Butyl Sealants
Non-skinning, remain tacky. Use for metal roofing laps, gutter seams, HVAC ductwork. Not for exposed joints - must be sandwiched between materials.
Windows & Doors
Window and door perimeter sealing requires two distinct sealing strategies: exterior weather seal and interior air seal.
Exterior Perimeter Seal
Sealant: Polyurethane or neutral-cure silicone. Must handle ±25% movement from thermal expansion. Apply between window/door frame and rough opening after flashing installation.
- Apply after flashing, before trim installation
- Continuous bead on all four sides
- Tooled joint for proper adhesion
- Compatible with window manufacturer's coating
- Paintable if painting trim (use polyurethane, not silicone)
Interior Air Seal
Sealant: Low-expansion polyurethane foam or acrylic latex caulk. Foam for gaps 1/4" to 3" wide. Acrylic caulk for trim-to-wall gaps after trim installation.
- Foam: Fill gap between frame and rough opening
- Use LOW-EXPANSION foam only (won't bow frames)
- Fill 50% of gap depth, let expand to fill
- Trim excess after cure, cover with trim
- Caulk: Seal trim-to-wall joint after painting
Glazing Tape vs Wet Seal
Glazing tape: Pre-formed tape for glass-to-frame seal. Faster installation, more consistent. Used in commercial curtain wall, commercial storefront.
Wet seal: Liquid silicone applied with gun. Traditional method for residential, replacement windows, irregular conditions. More labor, requires skill for aesthetic finish.
Common mistake: Sealing window completely around entire perimeter creates moisture trap. Must leave weep holes at sill open. Only seal head and jambs fully. Sill requires drainage path.
Expansion Joints
Expansion joints accommodate movement from thermal expansion, seismic activity, settlement, and material shrinkage. Joint design determines sealant success as much as sealant selection.
Joint Design Fundamentals
Width-to-depth ratio: 2:1 ideal (joint twice as wide as deep). Minimum 1:1. Wider, shallower joints perform better than narrow, deep joints.
- Example: 1/2" wide joint → 1/4" deep sealant (2:1 ratio)
- Use backer rod to control depth
- Backer rod diameter = joint width × 1.25
- Two-sided adhesion only (sealant bonds to sides, not bottom)
- Three-sided adhesion = premature failure
Sealant Selection by Joint Type
| Joint Type | Movement | Recommended Sealant |
|---|---|---|
| Concrete slab (horizontal) | ±25% | Polyurethane (traffic-rated if vehicular) |
| Precast panel (vertical) | ±25% | Polyurethane or silicone |
| Curtain wall (perimeter) | ±50% | Silicone (structural or weatherproofing grade) |
| Masonry control joint | ±25% | Polyurethane or acrylic urethane |
| Seismic joint | ±50%+ | Silicone or specialized seismic sealant |
Backer Rod Selection
Closed-cell foam: Most common. Doesn't absorb water. Use for most applications.
Open-cell foam: Allows vapor transmission. Use in joints requiring vapor permeability or where off-gassing from substrate needs escape path.
Key principle: Never skip backer rod to save money. Cost: $0.10/ft for backer rod vs $5.00/ft for sealant replacement after three-sided adhesion failure. Backer rod prevents bottom adhesion and controls joint depth.
💡 Pro-Tip:
Get a rod that's about 25% bigger than your joint width. Yeah, it'll compress when you push it in—that's exactly what you want. We've seen too many callbacks from folks who eyeballed it or went too small.
Shop Sealants & AccessoriesGlazing Systems
Glazing sealants secure glass to frames while allowing thermal movement. Must remain flexible for 20+ years under constant UV exposure and temperature cycling.
Structural vs Weatherproofing Silicone
Structural silicone (ASTM C1184): Carries structural loads. Holds glass panels to building frame. Requires engineering calculations, tested assemblies. Two-part or one-part high-modulus formulation.
Weatherproofing silicone (ASTM C920): Seals against weather only - doesn't carry structural load. Standard one-part neutral cure. Most common for residential and light commercial.
Application Types
- Face glazing: Sealant applied to exterior face after glass installation
- Heel bead: Interior seal between glass and frame
- Toe bead: Exterior seal between glass and frame
- Cap bead: Cosmetic seal over exterior pressure cap
- Wet glazing: Glass bedded in sealant during installation
Edge Clearance Requirements
Glass edge must have minimum clearance from frame for sealant bite:
- Minimum bite depth: 1/4" for glass up to 1/4" thick
- Minimum bite depth: 3/8" for glass over 1/4" thick
- Minimum width: 1/4" each side
- Setting blocks required every 24" to support glass weight
- Do not seal where setting blocks located (compression point)
Critical: Never substitute weatherproofing sealant for structural sealant. Glass will fall out. Structural glazing requires engineering, tested systems, and quality control. Not a DIY application.
Concrete & Masonry
Concrete and masonry require sealants that bond to porous, alkaline substrates and handle significant movement from thermal expansion and material shrinkage. Repairing cracks rather than sealing designed joints? The concrete crack repair guide covers crack filler vs concrete caulk vs self-leveling sealant, including when a crack needs rigid repair instead of sealant.
Control Joints vs Expansion Joints
Control joints: Masonry walls, cast-in-place concrete. Accommodate shrinkage and minor thermal movement. Spacing every 20-25 feet typical.
Expansion joints: Between different materials, building sections, seismic separations. Greater movement capability required. Spacing per structural design.
Both require polyurethane or silicone sealant with proper joint design (backer rod, 2:1 width-to-depth ratio).
Surface Preparation
- Remove form release agents, curing compounds, laitance
- Sandblasting, grinding, or diamond blade sawing for joint faces
- Clean with wire brush and vacuum
- Allow new concrete to cure 28 days minimum before sealing
- Surface must be dry (moisture meter <12% for polyurethane)
- Primer required for porous concrete block, split-face CMU
Horizontal vs Vertical Joints
Horizontal joints (slabs, sidewalks, driveways): Use self-leveling polyurethane. Flows into joint, self-tools. Traffic-rated for vehicular areas. Non-sag formulation for slopes.
Vertical joints (walls, precast panels): Use non-sag polyurethane or silicone. Gun-grade consistency that won't slump before cure.
Common Applications
- Tilt-up panel joints: Polyurethane or silicone, ±25% movement
- Parking garage joints: Self-leveling polyurethane, traffic-rated
- Masonry control joints: Non-sag polyurethane
- Foundation cracks: Polyurethane or epoxy injection for structural
- Precast panel perimeters: Silicone or polyurethane, ±25-50% movement
For exposed aggregate or heavily textured concrete, use wider joints (minimum 3/8" to 1/2"). Narrow joints on rough surfaces create inadequate bond area and premature failure.
Penetrations
Pipe, conduit, and duct penetrations through walls, floors, and roofs require sealing for air, water, fire, or smoke control.
Fire-Rated Penetrations
Penetrations through fire-rated assemblies require UL-listed firestop systems. Cannot substitute generic sealant.
- Must use exact products, configurations from UL system
- Metal pipes: Intumescent caulk or wrap strips
- Plastic pipes: Intumescent caulk (expands to fill melted pipe)
- Cable bundles: Firestop pillows or bags
- Large openings: Mineral wool + firestop caulk
- Document with photos and red system tags per code
Non-Rated Penetrations
Air sealing: Low-expansion polyurethane foam for penetrations through building envelope. Required by energy code.
Water sealing: Polyurethane or silicone sealant for roof and exterior wall penetrations. Include flashing or boot accessories.
- Electrical: Fireblock foam around boxes, foam or caulk at exterior
- Plumbing: Polyurethane or silicone around pipe sleeve
- HVAC: Flashing boot + sealant at roof penetrations
- Pest control: Copper mesh + polyurethane foam to exclude rodents
Roof Penetrations
Roof penetrations require both mechanical flashing and sealant. Sealant alone will fail.
- Pipe flashing boot (EPDM or metal) + polyurethane or silicone at base
- Pitch pan: Fill with polyurethane or silicone (not asphalt)
- Curbs: Reglet flashing + polyurethane or butyl sealant
- Never rely on sealant without proper flashing
- Inspect annually and reapply as needed
For complete roof system guidance, see: Elastomeric Roof Coating Guide
Code requirement: Fireblock foam now required at all penetrations through top plates, rim joists, and between floors per IRC/IBC energy provisions. Use red/orange color foam - easier for inspectors to verify compliance.
Exterior Siding Gaps
Gaps between siding panels, at corners, and around windows and doors are the most common exterior caulking jobs. The right sealant depends on siding material — vinyl, wood, and fiber cement each expand differently and accept different chemistries. Getting this wrong leads to cracked caulk lines within 1–2 seasons.
Caulk Selection by Siding Type
| Siding Type | Best Choice | Alternative | Avoid |
|---|---|---|---|
| Vinyl | SilTex 40 Siliconized Acrylic | TruSil 100 Clear (acetoxy 100% silicone — fine on vinyl, not on copper/brass/zinc trim) | Plain acrylic latex |
| Wood / Cedar | SilTex 40 Siliconized Acrylic | Polyurethane sealant | Acetoxy silicone (can stain wood) |
| Fiber Cement (HardiePlank) | SilTex 40 Siliconized Acrylic | Polyurethane sealant | Plain acrylic latex |
| Metal Siding (galvanized, painted, coated) | MS Polymer or polyurethane sealant | TruSil 100 (acetoxy) on coated/painted metal panels; not on bare copper/brass/zinc/weathering steel | Acetoxy silicone on bare reactive metals |
Where to caulk: Butt joints, corner boards, trim transitions, window and door perimeters, penetrations (vents, lights, spigots).
Do NOT caulk: Horizontal lap overlaps (must drain freely), bottom edge of siding courses, weep holes. These openings are designed to shed water — sealing them traps moisture behind the siding and accelerates rot.
Application Tips
Clean surfaces — remove dust, loose paint, and old caulk before applying
Use backer rod for gaps wider than 1/4″ to control depth and prevent three-sided adhesion
Tool immediately after application with a wet finger or caulk tool for a smooth finish
Apply between 40°F and 90°F — cold surfaces prevent adhesion, hot surfaces skin too fast
Siliconized Acrylic Caulk for Siding
View all 9Metal Roofing & Siding
Metal panels undergo significant thermal expansion - more than most substrates. Sealant selection must account for this movement and metal compatibility.
Panel Lap Seams
Butyl sealant tape: Pre-formed tape applied between panel laps before fastening. Most reliable method. Never hardens, stays sealed through expansion/contraction.
Butyl caulk: Tube-applied for field conditions, repairs, or irregular laps. Non-skinning formulation. Must be compressed between panels - not for exposed applications.
End Laps and Transitions
- Horizontal end laps: Butyl tape under lap, polyurethane or silicone at exposed edge
- Ridge caps: Butyl tape under cap, closure strips at openings
- Valley flashings: Polyurethane or silicone at panel-to-valley transition
- Trim pieces: Neutral-cure silicone (acetoxy can corrode some metals)
- Fastener heads: Generally don't seal - use proper washer, allow drainage
Metal Siding Panels
Panel-to-panel: Silicone or MS Polymer. Paintable sealant if panels painted. Neutral-cure silicone for anodized aluminum, copper, weathering steel.
Panel-to-frame: Polyurethane or silicone. Accommodate movement at perimeter joints with backer rod and proper joint design.
Metal Compatibility
- Acetoxy silicone corrodes: Copper, brass, zinc, lead, weathering steel
- Use neutral-cure silicone on metals above
- Galvanized steel, aluminum, stainless: Acetoxy or neutral both work
- Anodized aluminum: Neutral-cure only (acetoxy etches coating)
- Kynar/PVDF coated panels: Check coating manufacturer compatibility
Thermal expansion: 100-foot aluminum panel can move 1.5 inches between winter and summer. Use high-movement sealants (±50% silicone) at expansion joints. Avoid rigid sealants like acrylic or low-grade urethane on metal.
Sealant Selection Matrix
Quick reference for selecting the right sealant based on application requirements.
Application vs. Chemistry Quick Guide
Professional contractors think in jobs, not chemistry. Use this table to jump directly to the right sealant type for your application.
| Application / Job | Best Choice | Good Alternative | Do NOT Use |
|---|---|---|---|
| Concrete Expansion Joint | Polyurethane | MS Polymer | Acrylic Latex |
| Structural Glass / Curtain Wall | Silicone (Structural) | — | Polyurethane |
| Window/Door Perimeter | MS Polymer | Polyurethane | Acrylic Latex |
| Indoor Paintable Trim | Acrylic Latex | MS Polymer | Silicone |
| Kitchen & Bath (Wet Area) | Silicone (Neutral Cure) | — | Acrylic Latex |
| Roof Flashing/Penetrations | Polyurethane | MS Polymer | Acrylic Latex |
| Exterior Siding Gaps | Siliconized Acrylic | Polyurethane | Plain Acrylic Latex |
| Metal Roofing/Siding | Silicone (Neutral) | MS Polymer | Acetoxy Silicone |
Detailed Selection Matrix
| Application | Movement | First Choice | Alternative | Notes |
|---|---|---|---|---|
| Glazing (glass to frame) | ±50% | Silicone (neutral cure) | — | No alternatives acceptable |
| Expansion joints (concrete) | ±25% | Polyurethane | Silicone | Self-leveling for horizontal |
| Window/door perimeter | ±25% | Polyurethane | Neutral silicone | Paintable if trim painted |
| Interior trim & molding | ±7-12% | Acrylic latex | Siliconized acrylic | Painter's caulk |
| Metal panel joints | ±50% | Silicone (neutral cure) | MS Polymer | Check metal compatibility |
| Kitchen/bath (wet areas) | ±25% | Silicone (neutral cure) | — | Mold/mildew resistant |
| Shower/tub surrounds | ±25% | Silicone (neutral cure) | — | 100% silicone only |
| Large gaps (1/4" to 3") | — | Foam (low-expansion) | Backer rod + sealant | Must be covered |
| Fire-rated penetrations | Varies | Firestop (UL-listed) | — | Follow tested assembly |
| Metal roof laps | High | Butyl tape | Butyl caulk | Compressed between panels |
| Acoustical sealing | — | Acoustical sealant | — | Non-hardening formula |
| Marine applications | ±25% | MS Polymer | Polyurethane | Saltwater resistant |
Sealant Yield Calculator
Estimate how many cartridges, sausage packs, or pails a job needs from joint dimensions and total length. The full coverage math and bulk packaging formats are on the ASTM C920 standard page.
How much sealant do I need?
Coverage formula: linear feet per unit = package volume (cubic inches) divided by (bead width x bead depth x 12). A 10.1 oz cartridge holds about 18.2 cubic inches; a 20 oz sausage holds about 36.1 cubic inches. Reference coverage per 10.1 oz cartridge:
| Bead size (W x D) | Feet per cartridge | Cartridges per 100 ft (with 10% waste) |
|---|---|---|
| 1/4" x 1/4" | 24.3 ft | 5 |
| 3/8" x 1/4" | 16.2 ft | 7 |
| 3/8" x 3/8" | 10.8 ft | 11 |
| 1/2" x 1/4" | 12.2 ft | 10 |
| 1/2" x 1/2" | 6.1 ft | 19 |
| 3/4" x 3/8" | 5.4 ft | 21 |
Ordering by the case?
Tell us the sealant and case count and we'll quote bulk pricing. Typical turnaround: one business day.
or call 714-248-6555 · email partners@usmadesupply.com
Standards Reference
Industry standards govern sealant performance testing and classification.
ASTM C920: Standard Specification for Elastomeric Joint Sealants
Primary performance standard for building sealants. Defines classification system:
- Type: S (single-component) or M (multi-component)
- Grade: P (pourable/self-leveling) or NS (non-sag gun grade)
- Class: 12.5, 25, 35, 50, or 100 (movement capability in % ±)
- Use (location): T (traffic), NT (non-traffic), I (immersed)
- Use (substrate): M (mortar), G (glass), A (aluminum), O (other)
- Example: Type S, Grade NS, Class 25, Use T, NT, M, G, A, O = single-component, non-sag, ±25%, qualified for traffic and non-traffic on all four substrate test panels
Related: ASTM C920 Classification Guide | ASTM C509 (Gaskets for Glazing Systems)
ASTM C920 Compliant Sealants
View all 13


ASTM C1193: Standard Guide for Use of Joint Sealants
Installation and application practice for cold liquid-applied sealants — joint design and sizing, primer selection, backer rod use, tooling, and quality checks. Cited by spec writers as the application reference. Explicitly excludes structural sealant glazing (see ASTM C1184 below for that).
ASTM C1184: Structural Silicone Sealant Systems
System-level standard for structural glazing assemblies. Covers design calculations, bite dimensions, quality assurance programs.
ASTM C661: Indentation Hardness of Elastomeric Sealants
Shore A hardness testing. Most sealants: 20-40 Shore A. Traffic sealants: 30-50 Shore A. Softer = more movement capability but less abrasion resistance.
UL Standards for Firestop Systems
- UL 1479: Through-Penetration Firestop Systems
- UL 2079: Tests for Fire Resistance of Building Joint Systems
- ASTM E814: Fire Tests of Through-Penetration Fire Stops
- Each tested assembly has specific UL system number
- Must follow tested configuration exactly - no substitutions
See also: Fire Suppression Standards (NFPA, UL) | Firestop Requirements Guide
UL 181A & UL 181B: Duct Closure Systems
Listing standards for the tapes and mastics that seal HVAC ductwork. UL 181A closures (181A-P tape, 181A-M mastic, 181A-H heat-activated tape) seal rigid fiberglass duct board; UL 181B closures (181B-FX tape, 181B-M mastic) seal metallic and flexible ducts per IMC 603.9. Full decoder: UL 181 duct tape and mastic markings.
ASTM E90 & E413: Sound Transmission Testing
Acoustical performance testing. ASTM E90: Laboratory testing method. E413: Calculates STC (Sound Transmission Class) rating from test data. Acoustical sealants improve wall STC by 5-10 points.
Installation Best Practices
Proper installation determines 80% of sealant performance. Best materials fail with poor installation.
Surface Preparation (Most Critical Step)
- 1. Remove all old sealant, caulk, and loose material
- 2. Clean joint faces: Wire brush, grinder, or sandblast
- 3. Remove dust and debris: Vacuum, compressed air, or brush
- 4. Solvent wipe: Isopropyl alcohol, mineral spirits, or manufacturer-recommended cleaner
- 5. Allow to dry completely (moisture meter for critical applications)
- 6. Apply primer if required (test for necessity on sample area)
- Surface must be clean, dry, sound, and frost-free
💡 Pro-Tip:
Most sealant failures we see? Dirty surfaces. Wipe it down, use primer if the substrate needs it. Takes an extra 5 minutes but your sealant will actually stick around.
Shop Cleaners & PrepJoint Design
Width-to-depth ratio: 2:1 ideal, minimum 1:1. Example: 1/2" wide joint needs 1/4" sealant depth.
- Install backer rod to proper depth (joint width ÷ 2 for 2:1 ratio)
- Backer rod diameter = joint width × 1.25 (compressed fit)
- Use closed-cell backer rod for most applications
- Bond breaker tape as alternative to backer rod for shallow joints
- Two-sided adhesion only - sealant must not stick to bottom
Application Technique
- Cut nozzle at 45° angle to match joint width
- Hold gun at 45° angle, push (not pull) for better adhesion
- Apply continuous bead without voids or air pockets
- Slightly overfill joint for tooling
- Tool within skin-over time (5-30 minutes typical)
- Tool with light pressure to ensure contact with both sides
- Remove masking tape immediately after tooling
- Clean excess with appropriate solvent before cure
Environmental Conditions
- Temperature: 40°F to 100°F for most products (check data sheet)
- Surface must be dry - no rain, dew, frost, or standing water
- Relative humidity: 30-80% ideal for moisture-cure sealants
- Avoid application in direct sunlight on hot days (surface temp >120°F)
- Cold weather: Warm sealant to room temp before use
- Protect from rain for 24 hours minimum after application
Tooling and Finishing
- Tool to smooth surface and ensure proper bond
- Concave profile preferred (stronger than flat or convex)
- Use tooling spoon, finger (with glove), or strike tool
- Wetting solution: Soapy water for most sealants, mineral spirits for some
- Never use petroleum jelly or oil (prevents cure)
- One smooth pass - multiple passes leave streaks
Most common mistakes: (1) Dirty surface - adhesion failure, (2) No backer rod - three-sided adhesion failure, (3) Wrong width-to-depth ratio - cohesive failure, (4) Application in wrong conditions - cure failure. Fix these four issues and you eliminate 90% of sealant failures.
Troubleshooting Sealant Failures
Common failure modes and their root causes.
Adhesion Failure (Sealant Pulls Away from Substrate)
Symptoms: Clean separation at sealant-substrate interface. Substrate looks clean, sealant intact.
Causes:
- Dirty surface: Oil, dust, old sealant residue, form release agent
- Wet surface during application
- No primer on porous substrate
- Incompatible substrate (wrong sealant for material)
- Surface too cold during application
- Cure interfered with (contamination, moisture)
Fix: Remove all failed sealant. Clean surface thoroughly (sandblast, grind, or solvent wipe). Apply proper primer if needed. Reapply correct sealant in proper conditions.
Cohesive Failure (Sealant Tears in Middle)
Symptoms: Sealant splits down center. Both sides still stuck to substrate.
Causes:
- Joint movement exceeded sealant capability (Class 25 in Class 50 application)
- Joint too narrow for movement (improper joint design)
- Sealant degraded from UV, heat, or age
- Wrong sealant type (acrylic in expansion joint)
- Sealant overstressed before full cure
Fix: Calculate actual joint movement. Select higher class sealant (Class 50 instead of 25) or widen joint. Use proper width-to-depth ratio with backer rod.
Three-Sided Adhesion Failure
Symptoms: Premature cohesive or adhesion failure. Sealant stuck to bottom of joint (visible when removed).
Causes:
- No backer rod installed
- Backer rod too small (not making contact)
- Sealant penetrated through backer rod to joint bottom
- Bond breaker tape not used
Fix: Remove failed sealant. Install proper diameter backer rod (joint width × 1.25). Ensure rod compressed but not overly compressed. Reapply sealant.
Incomplete Cure (Stays Tacky or Soft)
Symptoms: Sealant remains sticky, gooey, or doesn't develop proper firmness after 7+ days.
Causes:
- Expired product (check manufacture date code)
- Contaminated substrate (silicone residue, wax, oil)
- Too cold during application (<40°F)
- Sealed cavity (moisture-cure product with no moisture access)
- Wrong product (butyl sealants never cure - that's normal)
Fix: If not cured after 7 days, remove completely. Clean substrate with appropriate solvent. Apply fresh sealant in proper conditions.
Staining or Discoloration
Symptoms: Dark staining around sealant joint on porous stone, concrete, or masonry.
Causes:
- Plasticizer migration into porous substrate
- Oil bleed from some silicone formulations
- Wrong product for substrate (use low-modulus, non-staining formulation)
- UV yellowing (polyurethanes yellow but remain functional)
Prevention: Test sealant on inconspicuous area first. Use low-modulus, non-staining formulations on porous stone. Seal stone before sealant application.
Sealant Type Comparison
Side-by-side comparison of major sealant types.
| Property | Silicone | Polyurethane | Acrylic Latex | MS Polymer |
|---|---|---|---|---|
| Movement capability | ±50% (best) | ±25-50% | ±7-12% (limited) | ±25% |
| Temperature range | -60°F to 400°F+ | -40°F to 180°F | 0°F to 180°F | -40°F to 200°F |
| UV resistance | Excellent | Good (yellows) | Good | Excellent |
| Paintable | No | Yes | Yes | Yes |
| Water cleanup | No (solvent) | No (solvent) | Yes | No (solvent) |
| Adhesion | Good (primer often needed) | Excellent (bonds to almost anything) | Moderate | Excellent |
| Durability | 20-50+ years | 10-20 years | 5-10 years exterior | 15-25 years |
| Shrinkage | Minimal | Minimal | Moderate to high | Minimal |
| Wet area use | Excellent (best choice) | Good | Poor | Good |
| Cost (relative) | $$$ (highest) | $$ (moderate) | $ (lowest) | $$$ (premium) |
| Best for | Glazing, metal panels, wet areas, high movement | Expansion joints, concrete, versatile workhorse | Interior trim, painter's caulk, low movement | Marine, RV, premium applications |
Specification Examples
Sample specification language for common applications.
Example 1: Concrete Expansion Joints
Joint Sealant: One-part, moisture-cure polyurethane sealant conforming to ASTM C920, Type S, Grade NS (non-sag) or P (self-leveling as indicated), Class 25, Use NT.
Color: As selected from manufacturer's standard colors.
Backer Rod: Closed-cell polyethylene foam, ASTM C1330, compatible with sealant. Diameter 25% larger than joint width.
Primer: As recommended by sealant manufacturer for substrate conditions.
Example 2: Glazing Systems
Glazing Sealant: One-part, neutral-cure silicone sealant conforming to ASTM C920, Type S, Grade NS, Class 50, Use G.
Color: Clear or as selected by Architect.
Performance: Compatible with insulating glass edge seals, Low-E coatings, and aluminum, vinyl, and wood substrates without primer.
Acceptable Manufacturers: Dow Corning 795, Tremco Dymonic Silicone, Pecora 890FT, or approved equal.
Example 3: Fire-Rated Penetrations
Firestop Sealant: Intumescent elastomeric sealant, UL-listed for specific application and hourly rating as indicated on drawings.
Ratings: Minimum 2-hour F-rating and T-rating per ASTM E814 and UL 1479.
Installation: Per tested and listed UL assembly. No substitutions permitted.
Documentation: Submit product data sheets, UL certifications, and installation photos. Install red UL system identification labels.
Example 4: Metal Panel Joints
Panel Joint Sealant: One-part, neutral-cure silicone sealant conforming to ASTM C920, Type S, Grade NS, Class 50, Use NT, A and O (substrate Use codes for aluminum and other coated metals — never Use M, which is mortar substrate).
Compatibility: Non-corrosive to anodized aluminum, Kynar-coated steel, stainless steel, and weathering steel. Provide manufacturer's written confirmation of compatibility.
Lap Sealant: Pre-formed butyl sealant tape, 1/4" thick × width to match panel rib spacing.
Color: Match panel color or as selected from manufacturer's standard colors.
Specification tip: Always specify ASTM C920 classification (Type, Grade, Class, Use). This ensures you receive a tested product that meets minimum performance requirements. Don't specify by brand only - use "or approved equal" with ASTM classification to maintain competition while ensuring quality.
Frequently Asked Questions
What's the difference between caulk and sealant?
No real difference - industry uses terms interchangeably. "Caulk" traditionally implies painter's grade acrylic latex for trim. "Sealant" implies higher-performance elastomeric product for expansion joints. Both seal gaps. Marketing term more than functional distinction.
Can I paint over silicone sealant?
No. Silicone repels paint - won't adhere. If you need to paint, use acrylic latex, polyurethane, or MS polymer sealant instead. Or paint surfaces before applying silicone. Some "paintable silicone" products exist but perform poorly - better to use different sealant chemistry.
How long does sealant last?
Silicone: 20+ years exterior, 50+ years protected. Polyurethane: 10-20 years (UV yellows but functional). Acrylic latex: 5-10 years exterior, 15+ years interior. MS Polymer: 15-25 years. Actual life depends on UV exposure, movement, substrate prep, and installation quality. Inspect annually, replace when cracking, hardening, or adhesion loss visible.
Do I need to remove old sealant before applying new?
Yes, always. New sealant won't bond to old degraded sealant. Cut out old sealant completely with utility knife, scrape joint clean, remove all residue. Clean with appropriate solvent (isopropyl alcohol, mineral spirits). Apply primer if needed. Then new sealant. No shortcuts - adhesion to old sealant will fail quickly.
What causes sealant to fail prematurely?
Top 5 causes: (1) Poor surface prep (dirt, oil, moisture), (2) Wrong product for movement (acrylic in expansion joint), (3) No backer rod (three-sided adhesion failure), (4) Improper joint design (too narrow, too deep, wrong ratio), (5) Application in wrong conditions (too cold, wet surface, high humidity). Surface preparation causes 80% of failures.
What's ASTM C920 Class 25 vs Class 50?
Movement capability. Class 25 = ±25% joint movement. Class 50 = ±50% movement. Example: 1" wide joint moving 1/4" needs Class 25 minimum (25% movement). Same joint moving 1/2" needs Class 50 (50% movement). Calculate actual expected movement, add safety factor, spec appropriate class. When in doubt, use Class 50 - costs slightly more but provides safety margin.
Do I need primer?
Depends on substrate. Always primer: Concrete block, porous stone, uncoated metal. Sometimes primer: Smooth concrete, wood, painted surfaces (test first). Rarely primer: Glass, glazed tile, aluminum, vinyl. Never primer: Butyl rubber, EPDM, TPO (incompatible). Check manufacturer data sheet. MS polymers often don't need primer - advantage of that chemistry.
How wide should my expansion joint be?
Calculate expected movement: Movement = thermal coefficient × length × temp change. Then: Joint width = movement / (sealant class × 2). Example: 1/2" total movement, Class 25 sealant → 1/2" / 0.5 = 1" minimum joint width. Rule of thumb: 1/4" to 1/2" joints for most building applications. Wider joints need special consideration.
Can I use the same sealant for everything?
No. Match sealant to application: Glazing → silicone. Expansion joints → polyurethane or silicone. Trim work → acrylic latex. Large gaps → polyurethane foam. Wet areas → neutral-cure silicone. Each chemistry has specific strengths. One-size-fits-all approach = premature failures and callbacks.
What's the difference between acetoxy and neutral cure silicone?
Cure chemistry. Acetoxy: Releases acetic acid (vinegar smell), cures faster, cheaper. Use for most applications. Neutral cure: Releases alcohols (mild smell), cures slower, more expensive. Use for metals (acetoxy corrodes), mirrors (acetoxy etches backing), kitchens/baths (acetoxy smell), natural stone (prevents staining).
How do I remove old silicone?
Mechanical removal only - chemical removers don't work well on cured silicone. (1) Cut bulk with utility knife, (2) Scrape remainder with razor blade scraper, (3) Final residue: mineral spirits and abrasive pad, (4) Surface must be completely clean for new sealant. Patience required - silicone bonds tenaciously.
Can I use exterior sealant indoors?
Yes, but watch VOC content. Exterior sealants often have higher VOCs. Check jurisdiction limits for indoor VOCs. Low-VOC and odor-free formulations available for sensitive interior applications. Always ventilate during application and cure. Read product label for VOC content and indoor use approval.
Why did my sealant never cure / stay sticky?
Several causes: (1) Wrong product (butyl sealants never cure - that's normal), (2) Contaminated substrate (silicone or wax residue prevents cure), (3) Expired product (check date code), (4) Too cold during application (below 40°F), (5) Moisture-cure sealant in sealed cavity (no moisture access). If doesn't cure in 7 days, remove and start over.
Can I use regular silicone on a furnace flue or hot surface?
Not recommended. Standard silicone is rated to 400°F continuous, but furnace flues often run hotter. Use high-temp RTV silicone rated for 500-600°F, or furnace cement for surfaces over 600�°F. Using standard silicone on hot surfaces causes premature hardening and failure. Check actual surface temperature with infrared thermometer - don't guess.
What's the difference between intermittent and continuous temperature ratings?
Continuous = temperature the surface stays at during normal operation (what to use for product selection). Intermittent = brief spikes in temperature (under 1 hour). Example: furnace flue might spike to 600°F when starting, but run at 300°F continuously. Select product based on continuous rating (300°F), not intermittent. Daily heating cycles count as continuous, not intermittent.
How do I know what temperature my surface reaches?
Use an infrared thermometer gun to measure actual surface temp during normal operation. Don't rely on equipment specs - actual surface temp at seal point can differ from internal temp. Measure multiple times during normal operating cycles to find maximum continuous temperature. Add 100°F safety margin when selecting sealant rating. Surfaces feel "hot to touch" at 120°F, but may be 300°F+ - don't guess.
What's better for concrete joints - polyurethane or silicone?
Polyurethane for most concrete: Better adhesion, paintable, more abrasion resistant, lower cost. Use silicone only if: (1) Extreme movement (Class 50 needed), (2) High temps above 180°F, (3) Chlorinated water/pool decks, (4) Non-paintable acceptable. Polyurethane is the workhorse for concrete expansion joints.
Can I apply sealant in the rain?
No. Surface must be dry. Moisture-cure sealants need atmospheric moisture but NOT water on surface. Water prevents adhesion - sealant won't bond to wet substrate. Wait for dry weather. If deadline critical, tent area and use heaters to dry surface before application. Check weather forecast before starting large projects.
What is the best exterior caulk for siding gaps?
Siliconized acrylic latex caulk for most siding types — vinyl, wood, and fiber cement. It's paintable, flexible enough for seasonal expansion, and bonds without primer. For metal siding, use neutral-cure silicone instead. Avoid plain acrylic latex outdoors — it dries hard and cracks within 2–3 years on exterior joints that move.
How do exterior specialty sealants compare in terms of UV resistance?
Silicone wins here. It won't yellow, chalk, or get brittle in direct sun, and it'll last 20+ years in fully exposed exterior joints. MS polymer/hybrid sealants are a solid second choice - good UV stability plus you can paint them (15-25 years typical). Polyurethane will yellow in sunlight but stays structurally sound for 10-20 years, so it's fine if you're painting over it. Acrylic latex is the weakest in UV - expect 5-10 years exterior before it starts cracking. Bottom line: if the joint sees direct sun and you're not painting, go silicone.
How do you select high-performance sealants for structural glazing applications?
Structural glazing uses two-part structural silicone that meets ASTM C1184. This is not a DIY application. The sealant has to be approved by the curtain wall manufacturer for that specific system, and the sealant manufacturer's engineering team needs to run structural calculations for your glass size, wind load, and dead load. You'll also need substrate compatibility testing (ASTM C794 adhesion) on the actual frame material and glass coating before you commit. Don't substitute weatherseal silicone for structural silicone - they look similar but have very different tensile and adhesion properties. Common products: Dow 795/983, Momentive SSG4000, Sika SG-500.
Which sealants offer the best UV resistance for exterior tile expansion joints?
Go with neutral-cure silicone. It handles UV, freeze-thaw, temperature swings, and won't stain porous tile or natural stone. Avoid polyurethane on light-colored tile - it yellows in sun and can bleed into porous grout. For pool decks, make sure the silicone is rated for chlorinated water immersion. Match sealant color to your grout, or use a translucent formulation. Keep joints at least 1/4" wide with a backer rod for the right depth-to-width ratio.
What factors should I consider when choosing exterior specialty sealants?
Start with UV exposure - if the joint gets direct sun, use silicone or MS polymer and skip acrylic latex. Then figure out how much the joint moves and pick Class 25 or Class 50 accordingly. Test adhesion on your actual substrates and use primer where the manufacturer says to. If you need to paint over the sealant, that rules out silicone - go polyurethane or MS polymer instead. Finally, think about chemical exposure: salt spray on the coast, pool chemicals, or industrial pollutants can all limit your options. Other things to keep in mind: cure time, VOC limits (especially in California under SCAQMD Rule 1168), tooling time for big joints, and color matching.
Do I need a firestop sealant for pipe and cable penetrations through fire-rated walls?
Yes. Every penetration through a fire-rated wall or floor needs a UL-listed firestop sealant installed as part of a tested system (UL 1479 / ASTM E814). Regular silicone or polyurethane won't cut it — you need the specific firestop product that matches the system number for your assembly. We carry Everkem's UL-classified firestop line: Firestop-814+ intumescent sealant, Fire Seal 136 residential firestop caulk, intumescent firestop collars, and fire-rated putty pads. See the Firestop Product Selection Guide for picking the right product, and the firestop inspection requirements guide for what an inspector will check.
Should I caulk all siding gaps?
No. Caulk butt joints, corner boards, trim transitions, and around windows and doors. Do not caulk the horizontal overlap between siding courses — those overlaps are designed to shed water and must drain freely. Also leave weep holes and the bottom edge of the lowest course open.
What is the best bathroom caulk?
A 100% silicone sealant with mold and mildew inhibitors. It stays flexible, won't shrink, and handles constant moisture around tubs, showers, and sinks. Everkem TruSil 100 (NSF-51 certified, mold and mildew resistant) works well in a tub-tile, shower-wall, or sink-counter joint — the acetic odor during the 24-48 hour cure dissipates with normal bathroom ventilation. For a mirror-backing or polished marble vanity edge, a neutral-cure silicone is preferred (we don't currently carry one). Avoid acrylic latex in wet areas — it looks fine for a few months, then cracks and grows mold. When recaulking, strip the old silicone completely first; new silicone won't bond to silicone residue.
What's the best concrete caulk?
Polyurethane sealant is the best choice for concrete joints and slabs. For horizontal joints like sidewalks and driveways, use self-leveling polyurethane that flows into the joint and self-tools. For vertical concrete walls or precast panels, use non-sag polyurethane. Always let new concrete cure at least 28 days before sealing, and remove any laitance or form-release residue so the sealant bonds to solid substrate.
Was this guide helpful?
Your feedback helps us improve our technical resources.